23 November, 2013

To You From Me


Happy Saturday everyone
It's my turn, Allison, to share a make with you and I decided to keep it simple yet again but also to show you that papers can be the whole feature on a card and not just for the backing.  I used some dies to cut shapes and inked the edges and used a sentiment stamp for the centre.  The fabulous papers are from the Happy Happy Birthday CD which is just jam packed with lovely papers and colour ways, digi stamps etc
Have a great weekend and pop back on Wednesday for some more inspiration.

AllisonX

15 November, 2013

Funky Little Christmas Showcase.....


Good Morning everyone!!!

Its that time of month again for our 'Forgotten Funkies' showcase!!! and each month our fabulous Funkette's will be here on our blog showing off some new makes with our older downloads. 

Today's showcase is centered all around the fabulously festive 'Funky Little Christmas' download. This download really packs a punch with its paper designs full of funky and zingy christmas colours and even comes with a sheet of card toppers that are just wonderful to play with.
Funky Little Christmas


So that's enough of my wafflies - you want to see what our gorgeous girls have come up with don't you?!!! ok, ok here they are.......

Please click on their names if you want to pop in to their personal blogs for more details as we just wanted to show off the pretties here!  Their personal blogs are full of details of how they created their makes so you don't want to miss that!


Lou.


13 November, 2013

Quick Stylish Tree Gift Cards

Hello there! Tabbatha here today to finish off my tour of Picasa 3 and show you how to add some yummy papers and save them into an Album for a particular project. Not only that, I have a tutorial for very cute and quick gift card holders. :D


So without further ado...Picasa 3 has a function that is called "Albums", these are Picasa-only folders that you can easily add items from different local folders to. I mostly use my Albums to create folders that I plan to upload to Online Galleries, such as Google+ Photos. In fact, this little trick is totally not my brain child, but of fellow DT member Sam! Also, if you sign in to Picasa, you have super easy way to sync anything just by clicking a little blue button on the upper right. Just be careful you don't sync and publicly share your digis or papers - only completed projects!!  :)
On the left hand of the Picasa window you will find a list of all all the Collections and up at the very top you'll find your Albums.

The Sync to Web button can be found in the title space in the main window of your Collections. If it is blue, then it means you are syncing.
When picking papers for your project, make sure to click on the "Hold to Selected Items" pin down there in the Selection Tray. For my gift card project I wanted to use some beautiful, Funky papers from the Stylish Tree Downloadables. I had thought about using some Christmas digis as well, but didn't put them on (as you will see later).

Once you have your papers in the Selection Tray, click on the little book in order to add them to an Album. Here, I've created a new Album called "Funky Hand Inspiration". One thing I make sure is that this album is NOT synced, again, publicly sharing digital stamps and papers is not allowed - only complete projects! 

So..at this point I have all my papers for my project selected and in an Album. After they are printed out the gift card making can begin!

Now that the paper is printed, this is what we'll be making!


Supplies needed: 
1 12x12inch cardstock of coordinating colors 
 4 sheets of coordinating digital papers from Stylish Tree Downloads
Double-Sided Tape
A cutting tool - here I'm using my Fiskars
And a scoring board (Scor-pal shown)
Liquid Glue (optional)
Embellishments


All of my measurements were done in inches due to the fact that my Scor-pal is in inches, sorry Metric Buddies! 

Step 1) Cut the 12x12 cardstock into strips 2.75" wide by 8.5" long. 


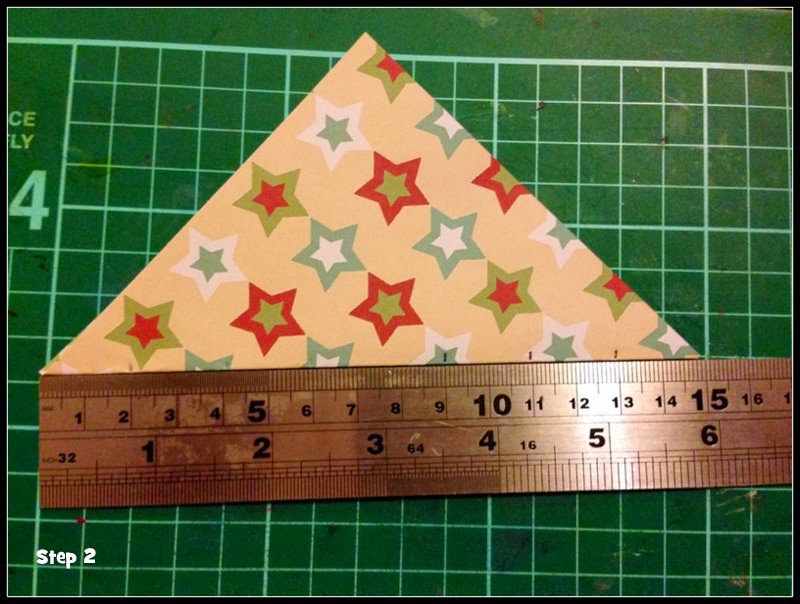
Step 2) Score each strip at the 1.5" mark and again at the 5.5" mark. Fold at each crease mark, using your bone folder to make the creases nice and crisp. What you'll end up with is a top-folded card. 


Step 3) Cut panels for the gift card. You will need a 2.5"x1.25" panel, a 2.5"x3.75" panel and a 2.5"x2.75" panel per gift card. For my set of 5, I had 15 panels in total cut. 


Step 4) Adhere the panels to the cardstock. This can be done a number of ways, double-sided tape, liquid glue or you can sew them in place like I did. I should note that I first applied a piece of double-sided tape to the middle of panel first (very very far away from the area I was going to sew) in order to keep the panel in place.


Step 5) Close up the card by putting some sort of adhesive on the lower panel's two sides and closing it up. You can then hide those pesky inner seems with washi tape! I picked a beautiful coordinating washi tape to cover the inner seems. It helps keep the sewing thread in place so that it doesn't unravel, as well as make it look pretty sharp on the inside. You could sew the sides together as well, I just went for a panel look instead. :D 


Step 6) Embellish to your hearts content. I didn't finish embellishing these little guys, but I made sure to add a nice Large button of a sorts that I could tuck the folded top flap into to keep it closed. You could use twine, magnets, or even velcro for that same purpose.


I know that this is a rather lengthy post, but I really love how the gift cards turned out and wanted to share how I did them, plus how I used Picasa 3 to keep my selected papers at hand. :D Thanks for stopping by and remember to link up any project you have made with Funky Hand Products below!

Cheers! /Tabbatha

09 November, 2013

New download releases & a special discount just for you..

Happy Saturday everyone,

Anice here to tell you a little about the brand new download releases that are now available on the        Funky Hand website.

I'm really pleased to have a new digital paper pack for you and introduce you to a new digital stamp character Georgie.

OK, less of my chat, have a look for yourselves,

http://www.funkyhand.com
The new paper download is called Little Princess and it is made up of twenty pretty backing paper in pinks, green and cream.  Perfect for making cards or other crafty creations for the little princesses in your life.

 http://www.funkyhand.com
 Georgie is the new digital stamp character that I want to introduce you to.  She is a little princess herself and today we are releasing the first three images.  These digital stamps are all hand drawn by me and tested out on my design team.  Click on the images here and go to the Funky Hand website to see the wonderful creations they have made using the backing papers and the Georgie digital stamps in the page galleries.

Before you go, here is something to help you a little with your crafting.  We are celebrating the new releases and you can have a gift.  Take 15% discount on all digital downloads from our store from now until Tuesday 12th November (midnight) by adding this code when you checkout of the website.

http://www.funkyhand.com
Well, that's all from me today.  I hope you like the look of the new downloads and pop over to the website to take a closer look.  If you do, don't forget your discount code.

Speak again very soon
Anice xx

06 November, 2013

A peek at the weekend new releases

Hi everyone, Anice here,

I thought I'd pop by today to give you just a little look at a couple of the Funky Hand new releases that will be available on our website www.funkyhand.com this coming weekend.

I'm really excited to be able to introduce you to my first 'cute' girl digital stamp character Georgie.  I've been a little naughty showing you this little peek as this is a card I made for Creative Cardmaking with Your PC magazine. (oops!)  It wont be for sale until December so I'd best not show you any more or I'll have my hand slapped!

 I just wanted to give you a little look..and for you to get the feel for the new backing paper collection also being released on Saturday.  Little Princess.  This collection fits perfectly with Georgie as she has turned out to be a bit of a 'Princess' already hehe!

Right that is your little look.  I'll be back at the weekend to offer you some inspiration as it's my turn to post here.. I'd best get my thinking cap on and come up with something good!

Speak again very soon,
Anice xx


02 November, 2013

Sleigh Ride Lacy Star

Hello All, Sammylou here and today I would like to share with you a paper ornament I have made.


The lacy star is really easy to make and looks stunning when finished (I hope you agree!). I have chosen papers from the Sleigh Ride download and below you will find a quick tutorial on how to make your own.

All you will need are some squares of paper (printed on both sides with the papers of your choice), a ruler, some scissors, a pencil and some glue or sellotape. I used 10.5cm squares but you can make them as big or as little as you want. So here's how to assemble it:


Step 1: Print your papers and cut to the desired size (as I mentioned above, mine are 10.5cm square). They have been printed  onto normal print paper as card would be too thick to bend.


Step 2: Fold the paper corner to corner and mark from the edges every two cms. Dependent on the size of paper you are using you will need to adjust this, just make sure you have three evenly spaced marks either side.


Step 3: Using the marks you have made cut towards the apex of the triangle but DO NOT allow the cuts to meet. When you fold out your square it should look similar to the photo below.


Step 4: Fold the two middle sections and secure with tap or glue. If you are using glue I would recommend you use paperclips to hold the fold while the glue dries.


Step 5: Take the next section and fold it in the opposite direction. It should look like this


Step 6: Continue with the other sections, folding in alternate directions. When complete you will have something that resembles this


Step 7: Repeat the process 5 times to build up your star:


And finally to assemble, just glue (or staple) the points together. Once you have attached all 6 points, punch a hole in the top of one and attach some raffia or twine to hang.

A quick and easy make for Christmas and a wonderful way to showcase the fabulous papers! I hope the tutorial has been useful to you and if you would like to share any of your makes, please link them below or head on over to the Facebook page to upload your photos.

See you all soon, love Sammylou xxx